- Knowledge Base
- Microsoft
- Configuring Email Profile for Microsoft Dynamics 365 / CRM

Article sections
| Summary: | An article describing the steps required to change the email profile settings for a Microsoft Dynamics 365 / Dynamics CRM User. |
| Article Type: | Troubleshooting / Support |
| Related Product(s): | This article relates to the following products:
|
| Related Articles: |
This article describes the steps required to change the email profile settings for a Microsoft Dynamics 365 / Dynamics CRM user. This document is relevant if the Email Router is installed. If the Email Router is not installed then the default settings should be kept.
Changing the Email profile for a user
1. Log in to Microsoft Dynamics 365 as a user with System Administrator rights.
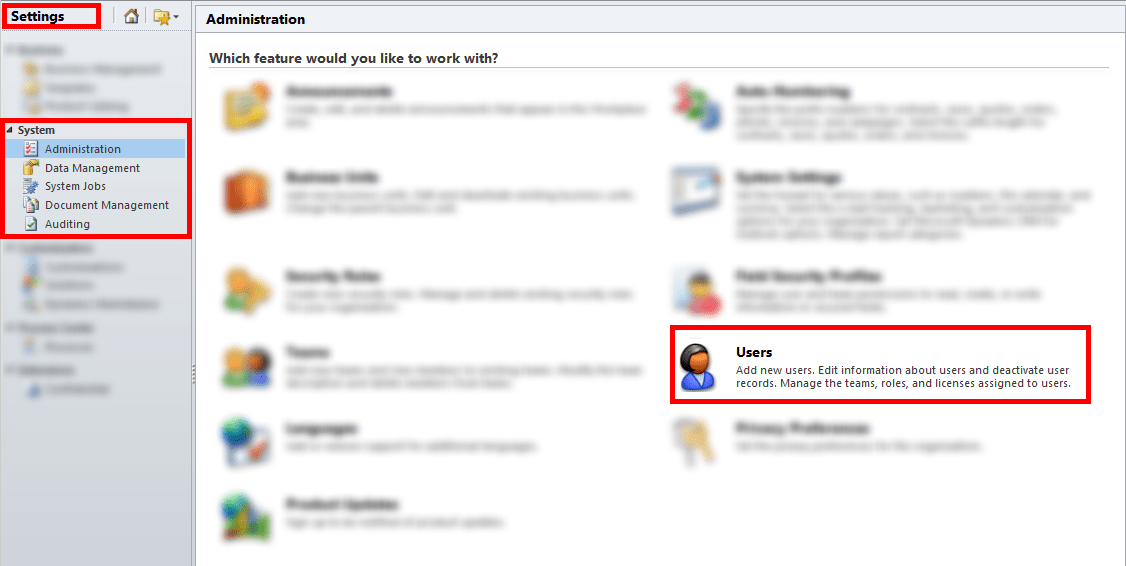
2. Navigate to Settings → Administration → Users
3. Select the desired user.
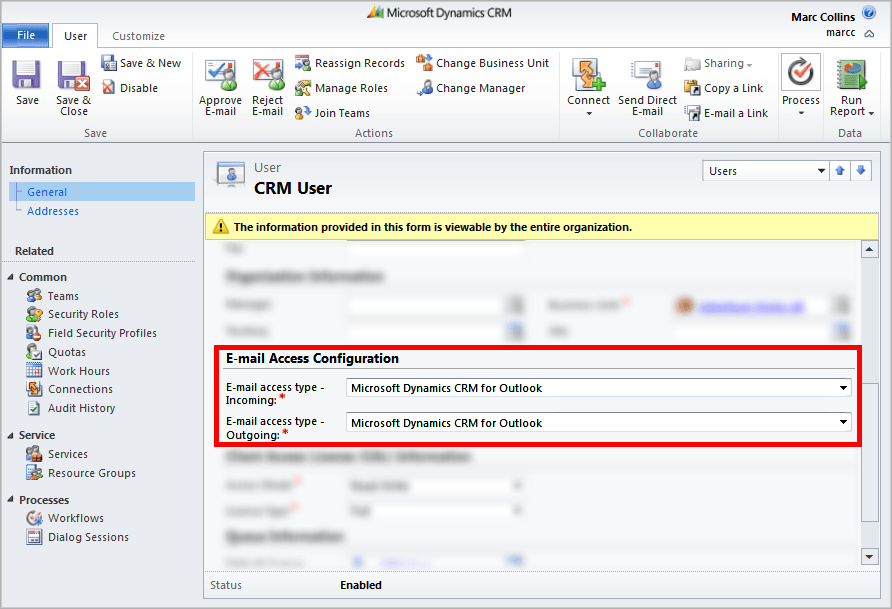
4. Scroll down to the E-mail Access Configuration section.
5. Change the E-mail access type (Incoming/Outgoing) to the appropriate setting.
Note: If you are unsure what setting to select, please contact your System Administrator
Below are the available options:
| NONE | Emails will not sync with CRM |
| Microsoft Dynamics CRM for Outlook | Emails will only sync when Outlook is open. |
| E-mail Router | Email Router will sync emails |
| Forward Mailbox | Emails will be forwarded to a single mailbox. Email Router will monitor this single mailbox. |
6. Save the record.
Changing User Settings in Bulk
It is possible to change this setting for up to 250 users at the same time. To achieve this, it will be necessary to create an On-demand workflow.
For more information on creating workflows or installing the Email Router contact us below.
[contact-form to=’support@qgate.co.uk’ subject=’Contact Form completed in KB WordPress Article’][contact-field label=’Name’ type=’name’ required=’1’/][contact-field label=’Email’ type=’email’ required=’1’/][contact-field label=’Contact QGate’ type=’textarea’ required=’1’/][/contact-form]
| Related Information: |
Related Articles
- Control your Office 365 users' password policies
- How to add new Entities
- Using Workflow to add Last Activity Date to a Case
- Using a Rollup Field to add Last Activity Date to a Case
- aBILLity Sales Order Processing Solution Compatible with Microsoft Dynamics 365
- aBILLity Standard Solution Compatible with Microsoft Dynamics 365
- How-to: Microsoft Dynamics 365 System Backups
- How to check your Microsoft storage use
- Modifying Silently in Dynamics 365
- Creating Microsoft Dynamics 365 Workflows Tips


