- Knowledge Base
- General
- Power BI Basics: Publish Docs to Power BI Service (Part 5)

Article sections
| Summary: | This Power BI Basics Series takes you through the steps of an end to end Power BI process and which personnel should be involved at which stage. The purpose of this series is to provide a quick overview so you can direct resources and plan the introduction of Power BI to your company. This is Part 5: Power BI Basics: Publish Docs to Power BI Service. |
| Article Type: | How To (September 2018) |
| Related Product(s): | This article relates to the following products:
|
| Related Articles: |
Power BI Basics: Getting Started with Power BI
There are many “How To” videos on Power BI but sometimes a quick overview of an end to end process can be helpful at the outset. Once the outline of the whole process has been understood (without detail at every stage) it is then possible to plan how your business should approach Power BI and which personnel should be involved at which stage. The purpose of this series is to provide that quick overview so you can direct resources and plan the introduction of Power BI to your company. This final article (Part 5) explains how to Publish Docs to Power BI Service.
This Power BI Basics series covers the following topics:
- Power BI tools & Licensing overview
- Importing and Transforming data
- Power BI Data Modelling
- Creating Visualizations
- Publish Docs to Power BI Service
Publish Docs to Power BI Service
After a Report has been completed it can be shared with other users via the Power BI Service.
Note: Suitable licenses are required in order to share a document, for example, Power BI Pro.
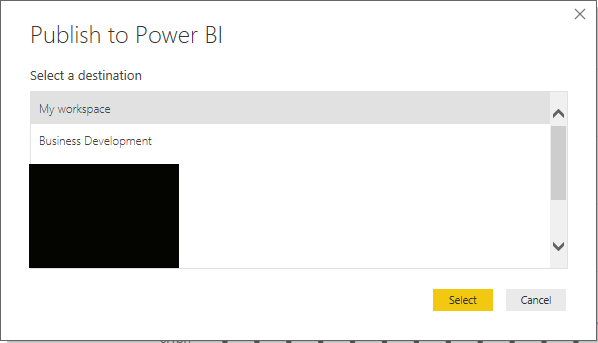
After clicking on “Publish” the pane below will show.
In this pane the destination of the report is chosen. Every user has their own workspace. In addition, other shared workspaces can be added, for example, Business Development in the screenshot above. And groups of users can be assigned to custom workspaces.
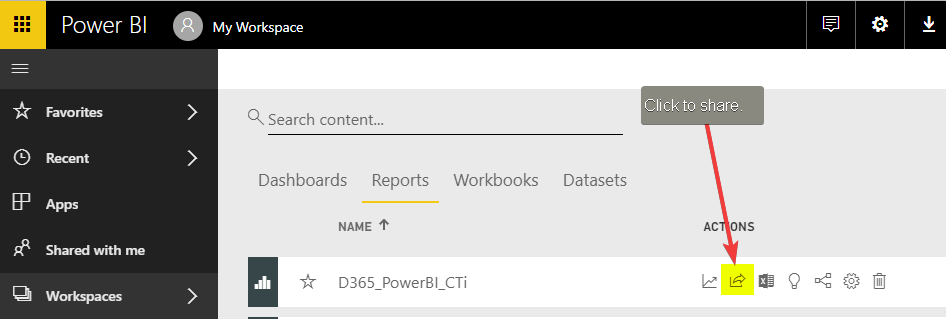
If the report is published to a shared workspace those assigned users will be able to see the document immediately. If the document is published to your own workspace then a separate step to share the Report is needed as shown in screenshot below.
You can share with read only or read and re-share rights to users within your organisation or outside users with an Office 365 account and suitable Power BI license. A URL is generated. The URL and can be emailed automatically to the recipient(s) or copied and forwarded on manually.
Immediately after publishing a Report it will not have a Dashboard. Dashboards are areas which can be used to combine chart objects (known as tiles) from multiple Reports. A Dashboard can also be shared. When a Dashboard is shared the underlying Report and Data set is also shared. When a user clicks on a tile within a Dashboard they will automatically be navigated to the underlying Report in which they can carry out further analysis.
Thank you for reading our Power BI Basics series, good luck with your projects.
Related Articles
- How does Power BI Licensing work?
- Understanding Date Fields in the Dataverse
- Power BI URL Filtering
- Create Custom Reusable Controls in PowerApps
- Microsoft Flow FAQ
- Creating Microsoft Dynamics 365 Workflows Tips
- How to: Creating a "Run Once" Daily Trigger using Power Automate
- How-to: Microsoft Dynamics 365 System Backups
- How to check your Microsoft storage use
- Modifying Silently in Dynamics 365


